
Building 34, No. 535 Shunfeng Road, Hangzhou, Zhejiang, China
[email protected]
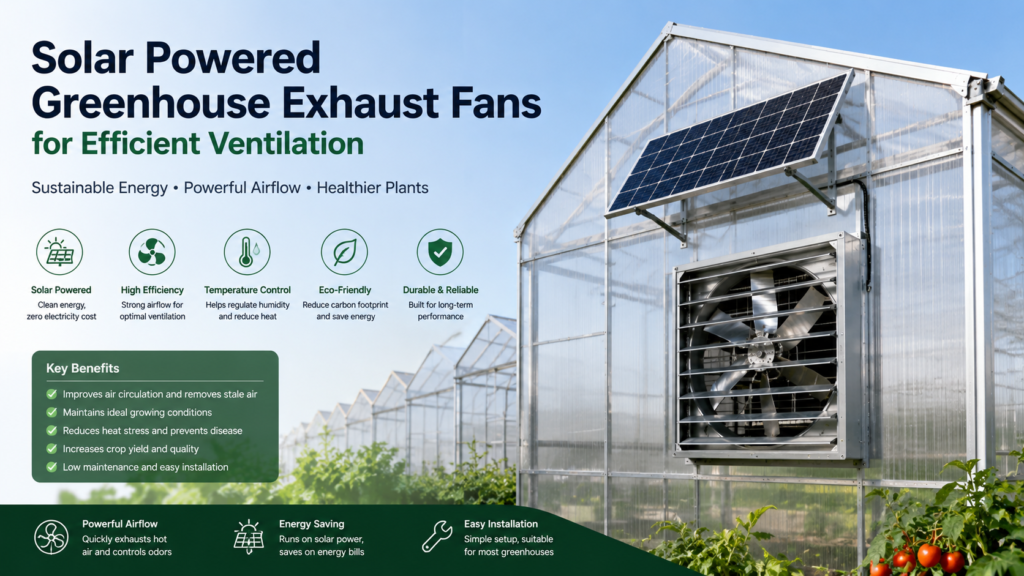

Solar powered greenhouse exhaust fans: Fans that exhaust hot, stale air from a greenhouse using electricity generated by solar panels. They reduce heat accumulation on sunny days, assist in controlling humidity, and circulate fresh air around plants. Many growers employ them to reduce stress on tomatoes, leafy greens, and herbs, particularly in warm or high light climates. Since there’s no grid power required, they’re great for remote sites, small farms, and even backyard hobby greenhouses. Fan size, placement, and matching solar panel output matter a lot for consistent air flow. The following sections walk through how these fans work, what to check before you buy, and how they fit into a complete climate plan.
Solar exhaust fans harness the sun’s energy to power a fan that exhausts hot air out of the greenhouse and pulls in cooler air through vents or openings. The system ties together four main parts: the solar panel, the fan and motor, a thermostat, and a louver system that guides airflow and blocks backdrafts.
The solar panel sits outside and absorbs the sun rays, then converts them into direct current power with a voltage that fluctuates as the level of light changes. This direct current power powers the fan, so when the sun is fierce, the fan whirrs, and when clouds drift by, the fan decelerates. That seasonal shift corresponds with actual greenhouse requirements since hotter, sunnier days demand increased air exchange.
Panel wattage determines the maximum area air that can be moved. A little 20 to 30 W panel might fit a compact hobby tunnel, and a large commercial bay could use 100 or more per fan. If your panel can’t provide enough watts, your fan will run weak and won’t clear heat buildup.
Panel placement is essential for consistent output. Panels must be in full sun most of the day, generally in a 15 to 45 degree tilt, facing south in the northern hemisphere or north in the southern. If the panel is shaded by nearby buildings, trees, or even other greenhouse structures, the fan can stall just as the house heats up.
Solar panels in these systems operate off-grid, unconnected to the utility electrical grid. This reduces operating costs and bypasses wiring permits in a lot of places. The trade-off is simple: unless you add a battery, the fan will not run at night or during long, dark storms.
The fan is the component that pushes air outside of the greenhouse, sucking warm humid air through the blades and expelling it outdoors.
Blade diameter and shape determine how much air you move and how fast. Big fans with aerodynamically shaped blades can move maximum air at minimal speeds, which benefits sensitive crops that despise hard drafts blowing on leaves. Smaller, high-speed fans fit in tight spaces but generate sharper air streams and more noise.
Quality fan units incorporate weather-resistant housings, UV-stable plastics, and coated metals. These components continue to operate in moist, corrosive greenhouse air and beneath roof condensation, which would corrode bare steel or low-grade plastics.
Convenient access is not a minor point. Fans collect dust, pollen, and insect bodies on the guard and blades. Tool-less designs that allow you to swing open a grille or simply remove the fan save you time and help keep airflow closer to design values long term.
Virtually all solar exhaust fans utilize efficient DC motors paired to the DC power that panels generate. This direct link bypasses inverters and keeps the system uncomplicated. Brushless DC motors are common in higher-quality units as they run quieter, vibrate less, and have a longer life than brushed designs.
The motor power rating has to be sized to both the fan size and the panel wattage. If the motor is too big for the panel, it will never run full speed in real sunlight. If it is undersized for the fan, it can overheat under load. Verifying that the rated current and voltage match the panel’s usual output helps prevent these problems.
Thermal protection is worth looking out for in the data sheet. Built-in cut-outs or temperature sensors shut the motor down when it runs too hot, which can occur in enclosed roof spaces or in scorching hot climates. This reduces the risk of motor failure and safeguards wiring insulation throughout the unit.
Thermostats cycle the fan on and off according to the air temperature inside the greenhouse, so you don’t need to monitor the thermometer all day. When the air reaches a set temperature, the thermostat closes the circuit and allows solar power to spin the fan.
Adjustable thermostats provide you with more control. You can have one temperature for cool-season lettuce and a higher one for warm-season tomatoes in the same structure at different times of year without changing any hardware.
Digital thermostats can provide more precise control and more transparent readouts than basic mechanical dials. Others permit narrow deadbands, so the fan doesn’t cycle too frequently and doesn’t permit large temperature swings. This goes a long way when you’re growing premium crops that respond to even minor heat stress.
Once installed, a thermostat reduces manual monitoring, which is important for bigger locations or when personnel cannot be present all day. The fan then runs only when heat really demands it, which reduces wear on moving parts and makes better use of solar power.
Louvers are located in front of or behind the fan opening to direct airflow and prevent infiltration when the fan is off. As the fan propels air out, the slats open or slide open and deflect the exhaust flow away from vulnerable crop areas, which can help prevent cold spots by vents in mixed-planting houses.
Automatic louvers open when the fan runs and drop closed when it stops. This prevents cold drafts and backdrafts at night or during windy days. In batteryless solar setups, where the fan powers down at sunset, automatic louvers are a big help in containing warm air post-dark.
Tight-fitting louvers minimize air leaks, which helps maintain consistent temperatures and moisture when heating systems are on. Good seals keep dust, bugs, and driving rain from leaking in around the fan opening.
For long life in damp, corrosive greenhouse air, louver frames and slats should utilize corrosion-resistant materials such as coated aluminum, UV-stable plastics, or stainless hardware. Cheaper bare steel louvers can rust in coastal or high-humidity areas, stick, and eventually not open, reducing the effective airflow of the entire fan system.
When it comes to sizing a solar exhaust fan, it starts with the space, the climate, and the plants. The aim is consistent air exchange that maintains temperature and humidity in the target range without squandering energy.
A quick comparison table helps narrow options before you look at brands:
| Feature | What it Means | What to Look For |
|---|---|---|
| Fan size (diameter) | Physical fan width in inches or millimetres | Match to greenhouse floor area and shape |
| Airflow (CFM / m³/h) | Volume of air moved per minute/hour | Enough for a full air change every 1–3 minutes |
| Panel wattage (W) | Solar power available to drive the fan | Sized for worst‑case (hot, still, partly cloudy) conditions |
| Thermostat range | Temperature control band | 0–50 °C (32–122 °F) for most greenhouse setups |
| Shutter design | How the vent seals when off | Passive aluminum shutter for weather and pest protection |
| Installation method | Mounting and wiring needs | DIY‑friendly kit with clear steps and basic tools only |
Fan selection begins with air volume. Calculate the volume of your greenhouse in cubic meters by measuring its internal length, width, and average height in meters and multiplying. This volume drives the airflow you require. Most growers aim for a complete air change every 1 to 3 minutes, so a 30 m³ house needs approximately 10 to 30 m³ per minute of airflow, or the corresponding CFM if the fan is rated in those terms.
Big or L‑shaped houses typically do better with two smaller fans rather than one large one, as this minimizes dead zones and helps push air across benches or stacked trays. Most solar fans come with a passive aluminum shutter that closes when the fan is off, trapping warm air overnight and preventing wind from back‑drafting into corners.
Under-sizing is easy to do. It results in hot, still air on clear days, even if the fan runs full-speed 24/7.
Your local climate provides the baseline for how hard your solar fan needs to work. In areas of intense, consistent sun, a reasonable panel can push impressive airflow through most of the day, so you wouldn’t need the top wattage. In cloudy or high-latitude regions, a higher-watt panel or an oversized fan maintains a minimum air exchange when the sun is weak, particularly in shoulder seasons.
Temperature swings are important too. For very hot summers, schedule faster air changes and favor higher CFM or m3/h ratings. In cold climates, growers typically employ thermostats with 0 to 50 °C (32 to 122 °F) ranges so the fan will only activate when the house is truly at risk of overheating, which reduces heat loss during the winter.
Humidity factors in. Humid environments require maximum or more frequent ventilation in order to expel moist air and reduce fungal issues, whereas dry environments might operate the fan less or combine it with shading and misting to prevent overdrying. Because solar fans pull solely from the sun, with no grid hookup, it’s worth designing for worst-case days as opposed to mild averages.
Plant type decides the fine tuning. A fan big enough for tomatoes may over-vent a shade-loving crop and dry it out.
First set target temperature and humidity bands by your main crop, then tune air exchange to how fast your house tends to heat up or hold moisture. A fan with a built-in thermostat provides easy control in this space. You set a trigger point, and the fan kicks in when the house crosses that threshold, then stops as it cools. This saves wear on the motor and uses solar power more effectively.
Use rough bands like the list below to align fan choice and control with your crop mix:
Solar fans are typically DIY-friendly, with transparent guides, uncomplicated brackets, and panel leads pre-attached. Growers can experiment with a single unit, record how temperature and humidity fluctuate during a week, and then expand or supplement with a second fan if plants persist with heat stress.
Proper installation determines not only how much air your fan really moves, but how reliably your system runs in the long term. Good mounting protects the greenhouse, the crop, and the equipment.
Solar panels require intense, consistent light. For most, that means installing them on a roof, frame, or adjacent pole where they have unobstructed sky exposure from mid-morning to late afternoon. A quick field check helps: stand where you plan to mount the panel and scan for any object that might cast a shadow as the sun moves.
Tilt is important for output. As a rough rule, set your panel angle near your local latitude in degrees, then adjust for season as desired. For instance, a 45-degree latitude site frequently performs best with a 40 to 45-degree tilt for year-round usage. When in doubt, use the angle range provided in the panel manual as that range factors in the frame strength and wind load.
Shade from trees or nearby buildings, vent pipes, and even greenhouse framing can chop power significantly. One sliver of shade across one portion of the panel can significantly reduce output for the entire unit, particularly with panels wired in series. Cutting back branches or raising the mounting frame can solve many of these losses.
Wind and storms put the mount to the test. For proper fan installation, use a rigid bracket or rail system that matches the panel size, clamp all corners, and anchor into a solid structure, not thin sheet only. Manufacturer hardware sets generally come with the correct bolt size, spacing, and torque recommendations. Adhering to those specifics minimizes the chances of panels shifting or ripping loose in heavy gusts.
Since hot air pools near the roof, exhaust fans are most effective when mounted high on an end wall or roof gable. That is where heat and humidity accumulate initially and where the fan can suction the hottest layer out before it sinks back down to the plants.
Cooler replacement air should enter low. Intake vents or louvers close to floor or bench height help set up a simple pattern: cool air in at the bottom, warm air out at the top. In a small tunnel, this can be one fan high on one end and a passive vent low on the other.
Air requires an unobstructed passageway. Avoid placing fans and vents near stacked boxes, tall tanks, dense shelving, or curtains that obstruct flow. If you’re hanging plants along the ceiling, leave an open space near the fan so air can flow without bumping into a wall of leaves.
Large greenhouses actually require more than a single fan. Space them along the length so that each covers a clean zone with some overlap, depending on the rated air volume and size of house. Even spacing minimizes dead corners where heat and humidity can persist, which is a concern for disease control.
Hardware selection influences both safety and longevity. Stainless steel or galvanized steel bolts, nuts, and brackets fare better in the humid, sometimes mildly corrosive atmosphere in and around a greenhouse. On plastic frames, wide washers distribute the load over a wider area and minimize the risk of cracking.
Every screw must be snug, not over-tightened. After the first day of running, check each bracket for play, because vibration can loosen a mount that looked solid at first. A lot of installers paint-mark bolt heads with a paint line so subsequent shifts are easy to find.
Any hole through glazing or roof panels is a leak risk. Install gaskets, rubber washers, or sealant rated for your particular material (polycarbonate, glass, or film) around fan flanges and panel feet. An attentive seal prevents rain from creeping inside and prevents damp areas that cultivate mold or rust in the vicinity of the mount.
Routine inspections keep it secure. A simple seasonal checklist works well: inspect brackets for rust, cracks, or bending, confirm panels and fans are still level and square, test that nothing moves when pushed by hand, and compare what you see with the manufacturer’s installation guide. If the guide gives different torque, spacing, or support points than you find on site, plan a fix before next storm season.
Solar powered exhaust fans are much more than hot air extractors for your greenhouse. When combined with intake louvers, circulation fans, vents, and simple monitoring, they aid in sculpting a stable climate that nourishes plant health, yield, and energy savings all at the same time. A well-designed system generally targets around one to three complete, well-timed air exchanges per hour. It then fine-tunes fan run time and vent openings to season, crop stage, and local weather.
Exhaust fans push damp air away before it settles on glazing, frames and leaves, reducing the chance of mold on fruit, flowers, and structural components. In some homes, impromptu exhaust fans and intake louvers join forces so when interior humidity surges post-irrigation or at night, the system can purge the air for you, no grower needed at the switch.
Even with solar powered fans, growers still want to track relative humidity with basic digital sensors at plant height. When humidity remains elevated, leaf spot, botrytis, and downy mildew move more rapidly, particularly in dense leafy canopies such as lettuce or basil.
In extended wet or rainy spells, it’s beneficial to operate fans more frequently, even if external air is cool, as moisture load, not temperature, becomes the primary issue. For really sensitive crops, like young ornamentals or seedling trays, fans commonly accompany small dehumidifiers. Fans manage general exchange while the dehumidifier reduces the final few percent of humidity during night periods.
Warm air dwells at the roof, cold damp air lies around benches. Exhaust fans at gable ends or high points pull out the hottest stratum, but they don’t always remedy the dead zones between beds.
Looking for more even temperatures and growth, many growers add small horizontal airflow fans to mix up still pockets of air and help push warm air back down. This combination of exhaust and circulation fans makes each plant experience similar conditions, promoting uniform height, leaf size, and flowering time across the bay.
Solar‑powered vent openers can assist in this regard. They automatically open ridge or side vents as the temperature rises and close them as it falls, maintaining stratification without requiring you to check the vents every day, particularly on cold days when windows only need to be open for a short period of time.
From an architectural perspective, in designing layouts, intake vents generally sit on the side facing prevailing winds, often the west, with exhausts on the east in high-westerly wind areas. For passive vents or operable windows, targeting a total opening area of approximately 20 to 40 percent of greenhouse floor area provides a good range for natural airflow that collaborates with the fans instead of competing with them.
Most insect pests and fungal pathogens love the warm, still, humid layers of air near the canopy. Frequent air exchange from solar exhaust fans shatters those layers and dries leaf surfaces sooner after irrigation. This creates a less hospitable environment for whiteflies, thrips, and many foliar diseases.
When stale air escapes through exhaust fans, it tugs airborne spores, fine dust, and even tiny flying bugs along for the ride. Over time, this consistent purge somewhat reduces the pressure of incoming spores and helps bolster other controls like biologicals or sticky traps.
Dryer conditions that well-timed ventilation creates reduce the risk of fungal outbreaks on crops such as tomatoes, cucumbers, and roses. That’s all well and good in the summer, but during the winter when the house is closed up tight, fans might require rigid foam board insulation around housings to reduce heat loss when they are off.
VENTILATION SHOULD SIT BESIDE, NOT REPLACE, AN INTEGRATED PEST MANAGEMENT PLAN Good practice marries exhaust fans, screened vents, and careful plant spacing with regular scouting, sanitation and, as needed, targeted treatments. In snow climates, growers monitor for south side snow piles that can obstruct lower intake vents or even crush them. Then, relocate vents or add raised louvers to maintain the ventilation system’s dependability.
Long-term ownership of solar powered greenhouse exhaust fans comes down to three things: steady care, realistic expectations about lifespan, and clear tracking of costs and savings over the years.
Maintenance maintains airflow and guards your solar budget. Dust on panels slashes power, and gunk on blades curbs airflow, so routine cleaning counts if you seek dependable cooling during scorching days. Wipe solar panels with a soft cloth and mild soap, and clean fan blades when you notice dust accumulating every 4 to 6 weeks in dry or dusty climates and less in cooler, humid regions. Put panels where they are in full sun all day, and mount them at a 15 to 45-degree angle facing south in the northern hemisphere and north in the southern hemisphere so cleaning really does reward you with energy gained.
Many premium solar fans employ brushless DC motors and a few are even rated to operate for nearly 10 years with virtually no internal maintenance. That’s only true if the wiring and hardware surrounding them remain intact. Check cables, junction boxes, and connectors for cracks, loose fittings, and any sign of corrosion, particularly in coastal or hothouse environments such as tightly sealed greenhouses with regular misting.
Adhere to the maker’s plan for oiling periods, including in the case of bearings and pivots, no matter how long they may be. Light, routine maintenance can extend fan lifespan well past a decade and assist the solar panels in achieving their usual 20 to 25 year life.
Longevity begins with the system’s composition and how it weathers sun, wind, and moisture. As for housings and blades, UV‑resistant plastics, powder‑coated steel, or aluminum stand up to constant sun better than bare steel or low‑grade plastic, which can fade, warp, or crack after a few hot seasons. Seek out IP‑rated enclosures for motors and junction boxes, as these keep dust and water out in damp greenhouse environments, particularly where overhead irrigation or fogging is common.
Warranty terms are among the most unambiguous indicators of in-the-flesh longevity. A lot of solar panels have performance warranties for as long as 25 years, which indicates the manufacturer anticipates them to remain efficient, albeit with potentially decreasing output. Fans tend to have shorter warranties, but 3 to 5 years or more of coverage on the motor and electronics is a helpful benchmark. Check if the warranty covers corrosion, UV damage, or just plain mechanical failure.
In day-to-day use, keep an eye out for rust on mounting brackets, hairline cracks in plastic shrouds, or any vibration or noise change from the fan. Catching those signs early lets you make small fixes, like replacing a bracket or sealing a crack, before they reduce the lifespan of the entire system. Handled with reasonable care and prompt repair of minor damage, a carefully selected solar powered exhaust fan will deliver 10 years or more of service, while the solar panels themselves can continue providing power for up to 25 years, allowing for fan replacements or upgrades without replacement of the array.
Cost savings grow at a snail’s pace with solar powered exhaust fans. For every hour the fan operates on sunshine, it doesn’t pull electricity from the socket, saving you money in the long run. On many greenhouses that require daily cooling during the summer, this can equal hundreds of kWh saved annually, particularly where fans blow during most afternoons during peak tariff hours. Over 10 to 20 years, that equates to a demonstrable return, long before you even consider avoided wiring and demand charges for bigger electric systems.
These fans transfer some expense from regular minor fixes to not so regular part swaps. Brushless DC motors and sealed bearings usually require less service than legacy AC fans, which means you’ll spend less time on replacements and fire drills. There is a long-term cost to plan for: battery replacement, if your system uses batteries for night or backup operation. Most batteries don’t last nearly as long as panels, so it’s reasonable to include a new battery bank every 5 to 10 years, dependent on chemistry and depth of use.
Solar systems in most parts of the country are eligible for incentives that enhance the total payback. The table below gives a simple view of common options:
| Option / Incentive | What it covers | How it affects payback |
|---|---|---|
| Upfront solar rebate | Part of panel and hardware cost | Lowers initial cash outlay |
| Feed‑in tariff or net metering | Credit for surplus power sent to the grid | Shortens time to break even |
| Tax credit for solar equipment | Percentage of system cost as tax reduction | Cuts real system cost over 1–2 years |
| Low‑interest green loan | Reduced interest rates for solar projects | Spreads cost with less interest |
With lower power bills, minimal maintenance, and shrewd utilization of rebates or credits, solar greenhouse exhaust fans remain a dependable cooling solution for 15 to 25 years and can provide a very decent return on investment, particularly in sun-drenched areas that have high electricity rates.
Greenhouses naturally trap heat and light, so future air must cool and refresh without wasting energy. Solar powered exhaust fans are at the center of this shift, connecting climate control to clean power and smarter controls.
Smart solar fans connect to tiny sensors that monitor temperature, humidity, and occasionally even CO₂ in real time. When the air becomes too hot or too humid, the fans increase in speed. When the climate falls back in range, they slow down again, which reduces noise and power consumption. It’s a huge improvement from simple on/off timers that disregard what plants experience.
A lot of new solar fans already employ brushless DC motors that can operate for nearly a decade with minimal maintenance. Combined with control boards, these motors respond excellently to variances in light, so the fan accelerates on sunny, scorching days when cooling need is most crucial and slows during temperate conditions. This natural “self-throttling” is logical in strong midday sunshine climates.
Growers begin utilizing mobile apps to monitor trends, not just instantaneous values. They observe how frequently the fan reaches maximum speed, the rate at which the greenhouse temperature drops following a heat spike, and areas with excessive humidity. This allows you to fine-tune vent placement or add intake louvers.
| Feature | Today’s Practice | Near‑Future Direction |
|---|---|---|
| Control trigger | Temperature setpoint | Multi‑sensor (temp, RH, CO₂, light) logic |
| Fan speed | Single or 2‑speed | Fully variable, tied to solar input and sensors |
| Monitoring | Local check only | App dashboards with alerts and trend graphs |
| Integration | Stand‑alone fan | Linked with vents, shading, and irrigation |
Solar powered fans run only on sunlight unless they’re connected to a battery. Incorporating storage allows the system to continue extracting heat after dark, which is essential for warm areas where nights remain above 25 °C.
A battery bank sized to your fan power draw and the hours you desire, post-sunset. For instance, a 60 W fan that ought to operate 5 hours at night requires roughly 300 Wh of usable energy. The installed capacity must be greater to compensate for losses. Deep-cycle batteries designed for renewables tolerate this daily charge and discharge cycle better than car batteries.
Growers who keep an eye on battery voltage, temperature and charge cycles can spot issues early. Basic meters or app-based battery monitors indicate if a unit is aging, allowing you to plan replacements and maintain stable air flow during critical development phases.
New solar fans benefit from lighter and stronger components, which alleviate stress on mounts and reduce power consumption. Composite blades that are finely balanced move more air at a given watt level, and UV-stable plastics resist cracking in the blazing sun of hot and cold regions alike.
Solar panel efficiency continues to rise with improved cell designs and coatings. A tiny 100 W panel, set in full sun at a 15 to 45 degree tilt facing south in the northern hemisphere, can now power a fan that would have required a much bigger module not so long ago. At panel lifespans close to 25 years, the cost per year of cooling continues to fall, so more growers can implement these systems.
Hardware around the fan requires attention. Corrosion‑resistant alloys and coated fasteners withstand humid air, salt by the coast and fertilizer residues, which tend to slash the lifespan of conventional steel frames. Meanwhile, makers experiment with bio‑based plastics and recycled metals to trim each unit’s footprint.
These material advances, coupled with more efficient storage and smarter control, fuel a broader shift toward renewable power in greenhouses and less reliance on fossil-based cooling as climates heat up.
Solar exhaust fans provide a direct route to fresher air, drier foliage, and continual plant growth. Panels tap free energy from the sun. Fans push stale air out and draw fresh air in. Plants experience less heat stress along with less mold risk. Growers save kilowatt-hours and reduce noise in the grow room.
Whether you have a small tunnel with salad greens, a rooftop hobby setup or a full glass house, solar fans scale with the space. Panels mount on top of the roof. Fans are mounted high on the wall. Easy mechanisms provide pure air circulation and minimal operating expenses.
To plot your next move, plan your greenhouse size, plot your hot spots, and then shop one or two solar exhaust fan kits that match your layout.
Solar exhaust fans have a small solar panel that runs a DC motor. When sunlight falls on the panel, the fan operates and sucks hot, humid air out of the greenhouse. There is no grid power, no wiring to the house, and they shut off automatically when the sun goes down.
Match fan capacity with greenhouse volume. As a general guideline, strive for a complete air exchange every 1 to 3 minutes. Compute length times width times height (in meters) and check the fan’s m³/h rating. Bigger, sunnier greenhouses require more fans.
Yep, but slower. The fan speed varies according to sunlight. On bright cloudy days, most good systems still circulate decent air. For super cloudy climates, think about a battery backup or some kind of hybrid that could switch to grid power when necessary.
Install exhaust fans high on the hottest wall or roof. Install intake vents low on the opposite side for cross ventilation. Leave airflow paths free of shelves and plants. Attach the solar panel where it gets optimal sun, typically on the roof or on an adjacent pole.
For most growers, yes. They trim cooling bills, minimize heat stress and help stymie mold and disease. With no electricity run costs and minimal upkeep, good solar fans can pay back over a few growing seasons, particularly in warm or very sunny locations.
Clean the fan blades and grille a couple of times per year. Keep power output high by clearing dust and pollen off the solar panel. Inspect wiring, brackets and seals for damage or rust. Most systems run for years with nothing but basic minimal maintenance.
Just not necessarily. Solar fans are wonderful for providing baseline ventilation and heat removal. In very hot or humid climates, you may still have to use shade cloth, evaporative cooling, or misting. Consider solar exhaust fans as an essential component of a comprehensive climate control solution.


Contact us to find the best place to buy your Yakeclimate solution today!
Our experts have proven solutions to keep your humidity levels in check while keeping your energy costs low.